Webcam lighting for clearer photo booth pictures
By Shot after Shot · September 11, 2026 · 5 min read
Start with the brightest useful light in front of your face. During the day, try sitting facing a window, with your laptop in front of you. At night, try a lamp beside the screen. Before shopping for a ring light, check what those two changes do to your webcam picture.
For a photo strip, look at your eyes, the shadow under your chin, and the edges of your hands when you pose. Those details give you something specific to fix. You can keep the room cozy without letting your face disappear into it.
Put the window behind the camera
Sit facing the window, with the laptop between you and the glass. Keep the camera around eye level and check that the screen is not blocking most of the light. A bright window behind your shoulders can leave your face dark. This placement follows Logitech's webcam lighting guidance.
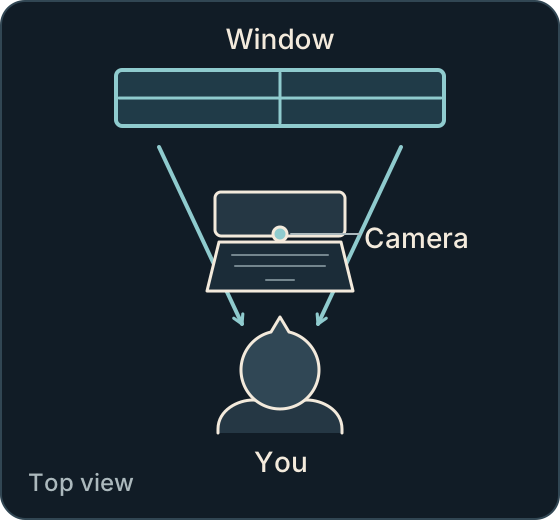 Daylight placement, shown from above. This diagram explains where to sit; it is not a comparison of captured photos.
Direct sun can be uncomfortable and leave a hard line of shadow across your face. Move out of the sunbeam or draw a sheer curtain over the window. Tilburg Science Hub's guide to filming at home recommends a translucent curtain to soften harsh daylight.
Once you like the light, check the crop again. Moving a laptop can improve the lighting and still leave half a hairstyle outside the picture. The photo strip layout guide explains the different arrangements; use the one you plan to keep when checking your composition.
At night, move a lamp near the camera
Try the lamp a little to one side of the screen, with its light slightly above your eyes. Watch the preview as you move it. You are looking for a position where you can see both eyes and still turn your head comfortably.
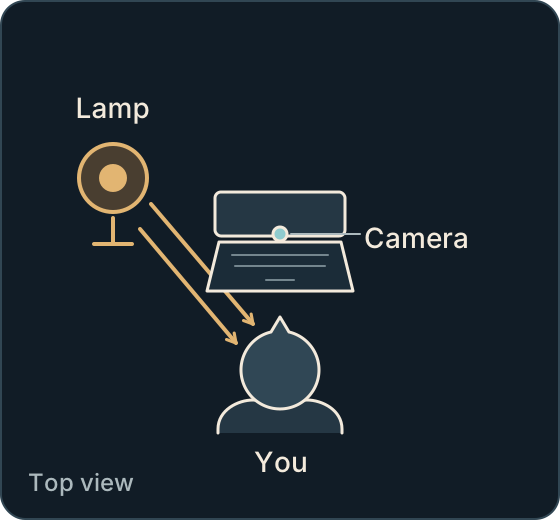 Lamp placement, shown from above. Start beside the camera, then adjust the height and angle while checking your face in the preview.
If a small lamp makes harsh shadows, try aiming it at a nearby white wall so the reflected light reaches you. The wall becomes a larger light source. This can soften the shadows, though a weak lamp may leave your face too dim after the bounce. Tilburg Science Hub describes using a white wall to soften light.
Keep the preview visible while making these changes. An angle that works for a straight-on smile might put a shadow across your eyes when you lean in for the next pose.
Match the adjustment to what you see
- A bright background and a dark face: Turn the setup so the window or lamp lights your face. If the furniture has to stay put, try closing the blind behind you and using a light near the camera. Check whether your eyes become easier to see without your forehead turning into a bright patch.
- Glare across your glasses: Move the lamp higher or farther to the side, checking the preview after each change. The useful angle depends on your lenses and how you hold your head. These are the adjustments suggested in Wistia's advice for lighting glasses. Try your actual poses before deciding the reflection is gone.
- One cheek looks orange, the other blue: Check whether a warm lamp and cool daylight are lighting opposite sides of your face. Turn one off or block it briefly, then compare. Mixed light colors are another problem covered in the Wistia guide.
- Grainy skin or a blurred moving hand: In dim light, a webcam may brighten its signal or use a longer exposure. The trade-off can be visible noise or blurred movement. Try more light on your face and pause in each pose. Elgato explains these trade-offs in its camera quality guide.
A monitor can add some light, but its brightness and color change with what is on screen. Keep a window or lamp as your main source while you compare setups.
Check one change before taking a full strip
Here is a comparison you can run with your own camera. Keep the framing, expression, and any selected effect the same so you have fewer differences to judge:
- Take a reference photo in your current position. Include your hands if they will be part of the pose.
- Change one thing: turn toward the window, shift the lamp, or close the bright blind behind you. Let the preview settle, then repeat the same pose.
- Compare the photos at the same size. Look for visible eyes, detail on both cheeks, and hands that have kept their shape. Choose the version you prefer, then try the next adjustment if needed.
If you are taking a strip with friends in different rooms, each person can do this check locally. One person's well-lit face tells you little about the lamp in somebody else's room.
When you find a position you like, leave the camera and light there for the sequence. Save the experimenting for the poses.
Read more on the blog or open the photobooth for solo or group sessions in your browser, with no account needed.